Jekyll Collections
on Jekyll
Motivation
Let’s say that you have a set of data that you want to auto-generate pages for.
Not only that, but you would like to have an index page for it as well. You obviously
don’t want to create every page by hand, as they would mostly be duplicates with variables
replaced. That’s where Collections come in.
For this example, we will use an example everyone is familiar with - your Credit Scores.
File Structure
- We will be modifying our
_config.ymlto be aware of the collection. - Add a directory to contain our records, per vendor.
- Create a file for each vendor.
- Create a layout template to display a single vendor.
- Create an index page to link to each of our vendors.
- Styling the score
Site Configuration
If you already have a ‘collections’ section in your _config.yml, you will want to just append into it. If not, you will need to create it.
collections:
  credit:
    permalink:         /credit/:path/
    output:            true
Using your local bundle exec jekyll serve as an example, that would make posts appear as:
- Index would be at http://127.0.0.1:4000/credit/
- A vendor page would be at http://127.0.0.1:4000/credit/TransUnion/
Vendor Records
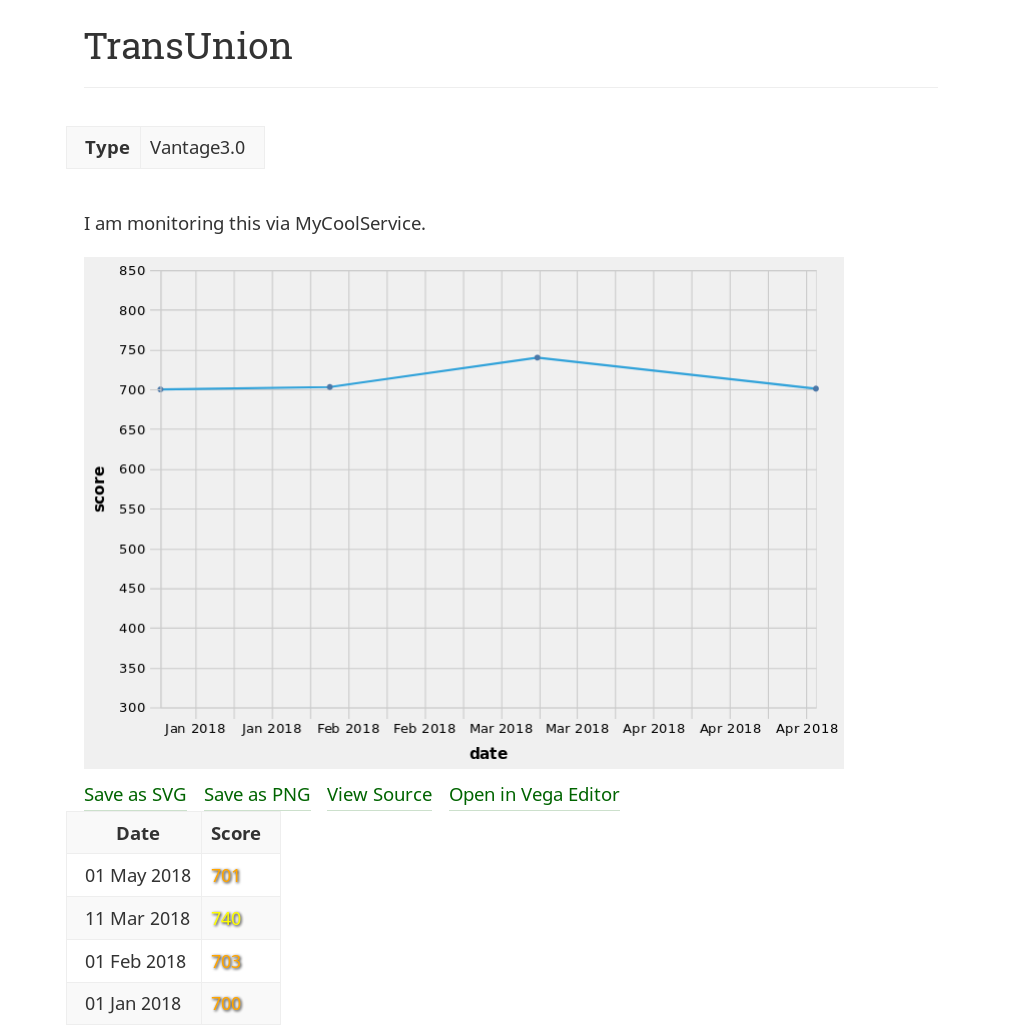
To host our /credit/ records, we will create a directory called _credit. Each vendor will have it’s own file in that directory. The above example would therefore be _credit/TransUnion.md and would look something like this:
---
layout: credit
title: TransUnion
type: Vantage3.0
records:
  - date: 2018-01-01
    score: 700
  - date: 2018-02-01
    score: 703
  - date: 2018-03-11
    score: 740
  - date: 2018-05-01
    score: 701
---
I am monitoring this via MyCoolService.
Let’s discuss a few details from above.
First, you will notice that the layout is listed as credit. That will cause it to be rendered with _layouts/credit.html (which we will create next).
The title will be displayed on both the page itself and the index.
You will notice that I specified a type of Vantage3.0. I didn’t really need to do that, but since they change the score ranges each time that changes, I thought I might want something to trigger on later. Also, I am including my various credit card companies and mortgage company, which instead have type: FICO.
The records are an array of admittedly fake data. For each one, I set the date attribute to YYYY-MM-DD and set a score attribute. You will notice that there was some variance in the dates. It’s important to keep those if you decide to ever chart the progress. Whenever you get around to monitoring your credit score, in this case, then add another record and commit it back into source control.
The final line is arbitrary content that can be displayed. I tend to use it for informational detail. Note that everything except for that last content is in the Front Matter.
Rinse and repeat with Experian and Equifax… or if you are so inclined, with your various creditors.
Vendor Page
If the directory doesn’t exist yet, create it.
Create the file _layouts/credit.html. The filename needs to match the layout name inside the collection record.
Using the above example file, you can do something like this:
---
layout: default
---

<article class="credit">

<table>
  <tr><th>Type</th><td>{{page.type}}</td></tr>
</table>

<div>
{{content}}
</div>

<table>
  <tr><th>Date</th><th>Score</th></tr>
{% for record in page.records reversed %}
<tr>
  <td>{{ record.date | date:"%d %b %Y" }}</td>
  <td>{{ record.score }}</td>
</tr>
{% endfor %}
</table>

</article>
This will loop through all records on a single vendor page and display them in a table.
The type information at the top doesn’t have to be in a table, but when you start adding additional attributes, it can look better.
The date will be reformatted to be human readable.
We can also add a nice Vega Chart to this, but that will be a later post.
Index Page
If you don’t already have a pages/ folder, create one.
Create a pages/credit.html. This will serve as your index page.
---
layout: page
title: "Credit Scores"
permalink: "/credit/"
menu: true
---
<ul>
{% assign sources = site.credit | sort: 'title' %}
	{% for credit in sources %}
	  <li>
        {% assign record = credit.records.last %}
		<a href="{{ credit.url }}">{{ credit.title }}</a> - Current Score: {{ record.score }}
      </li>
	{% endfor %}
</ul>
The Front Matter adds it to the menu. On a later post, we’ll add a couple graphs here as well.
We are listing the vendors alphabetically. For each one, we grab the most recent score reported (if you aren’t doing them in order, you might want to sort there by date), and then we show a link to the Vendor Page.
Styling the Score
The information is great and all, but maybe you want a quick glance of any scores that are really good/bad. Especially if you are doing more than the top 3 credit bureaus.
If you do not have an _includes/ directory yet, create one.
Create _includes/credit_score.html:
<span class="creditscore">
{% if record.score < 601 -%}
<font color="Crimson">
{% elsif record.score < 658 %}
<font color="OrangeRed">
{% elsif record.score < 720 %}
<font color="Orange">
{% elsif record.score < 781 %}
<font color="Yellow">
{% else %}
<font color="Lime">
{% endif %}
{{record.score}}</font></span>
This is based on the numbers/colors displayed on the TrueCredit website. I think most of them are similar.
The yellow is a bit hard to see on a white background. There are various ways you could address that. I chose to use a shadow. Hydejack supports SASS/SCSS, so I included this in my _sass/my-style.scss:
.creditscore {
  text-shadow: 1px 1px 2px #000000;
}
And now to use the new include.
Edit the newly created Index Page, and change
{{ record.score }}to
{% include credit_score.html record=record %}Now, that row on the index page will look something like this:

Once you do the same thing on the Vendor Page, it will look something like this:
To see how we add charts to this, take a look at the Vega Chart post.


