Welcome to the new build: Odin
on Odin
 A landscape photo would have worked out better, but I didn’t have the room.
Welcome to the Build Log
I normally run my machines 24x7 until they die. Sometimes at low load, sometimes doing prime number computations for a week straight at 100% load. Point is, it’s not easy being one of my dev machines.
Such was the life of my most recent machine until the pump went out. In theory, I could have taken the build apart to get to the pump, take the pump off the reservoir (it was an all-in-one kit), find a suitable replacement (no longer available) and put everything back together. That might have gotten me a few more months.
The thing is, I was already planning on doing a new build. My SSDs were starting to go, my power supply was getting finicky, fans were needing replaced, etc. You know it’s time when multiple parts are starting to fail.
The machine before that had hard drives and a power supply go out after going through multiple UPSs.
As I said, I’m hard on my hardware.
I’m hoping I can do a little better this time.
No, it won’t run less often. No, it’s not going to be a glorified text editor. This time, I am hoping to put myself in a position where I can (and want to) update the hardware a bit more frequently.
Before we start looking at the specs for the new machine, let’s take a look back at how we got here.
History
I won’t bore you wish the last couple decades of machines - just the specs on the last two, to help explain my choices for this build.
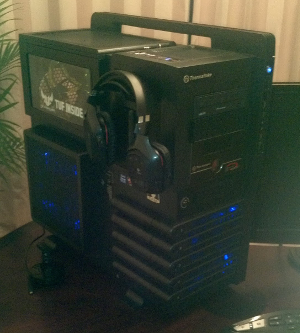
serveris 2007
The specs:
- Asus L1N64-SLI WS
- 2x AMD FX-70
- Thermaltake VA8004BWS
- Thermaltake HardCano 13
- 2x Kingston KVR667D2E5K2/2G
- Thermaltake 850Watt W0131
- an existing nVidia 6600GT
- 2x Hitachi Deskstar T7K500 250GB Serial ATA II (mirrored boot) - later expanded to 2x 1TB
- 5x Hitachi Deskstar T7K500 250GB Serial ATA II (raidz2 data) - later expanded to 8x 500GB
- 2x Addonics AE5RCS35NSA
- NEC Black Floppy (memtest86, hitachi drive tool, etc etc)
- an existing dual layer burner
- Belkin 1500VA/1000 joules UPS
- Belkin F1DE208C KVM
- 3x Belkin F1D9400-06 (for machines on the rack)
- 1x Belkin F1D9400-25 (for docking station on the desk)
The machine was running OpenSolaris as a Xen dom0, and I had multiple domU running on it.
As you can probably tell from the picture, the drives were the real advancement for me on this build.
At one point, I had multiple drive failures and managed to order, replace and resilver the new drives into place with 0 seconds of downtime. Can’t beat that. Love ZFS.
I was planning on doing the same for this new Odin build, but then realized that the motherboard didn’t have enough SATA ports on it. Rather than using my one free PCI slot for a raid controller, I … well, you’ll see.
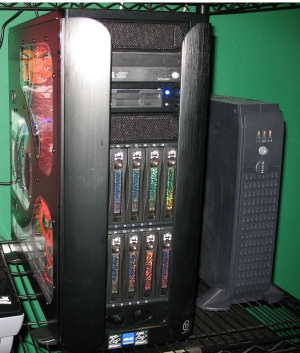
kallisti 2012
The specs:
- Case: Thermaltake Level 10 GT LCS
- Power Supply: Thermaltake TPG-1200M
- Memory: Corsair CML16GX3M4A1600C9
- Motherboard: Asus 990FX Sabertooth
- CPU: AMD FX-8150P
- Video: 2x EVGA GeForce GTX 580 FTW Hydro Copper 2 3072 MB
- BD: BDR-206MBK
- Windows Drive: Crucial M4 2.5” 512GB SATA III SSD
- Linux Drive: Crucial M4 2.5” 512GB SATA III SSD
- WiFi: Linksys WMP600N Wireless Dual-Band a/b/g/n
- Accessories:
- Logitech Wireless Keyboard K350
- Logitech Wireless Trackball M570
- Logitech Wireless Gaming Headset G930
- OS:
- Windows 7 Pro 64-bit [some MMOs]
- Linux Mint 12 LMDE (Debian Edition) [primary OS]
- My old Samsung SyncMaster T240HD
The machine started out with LMDE, but I got tired of it disabling the proprietary nvidia drivers every time I upgraded. I ended up switching to Ubuntu because it was better supported for Android and GWT development, and left my nvidia drivers in place.
This picture isn’t so obvious, but this was my first watercooled machine. I went with the soft tubing because, well, it was my first time. I didn’t do a lot of things that I now know you should, like clean the radiator first or flush the system once in awhile. I ran plain distilled water in it, let it run 24x7, and once in awhile I topped it off. That was about it.
One thing to note from this build was the radiator fans. The top of the case blew out EXTREME amounts of heat, which is good; except that the cats loved it so much they kept lying on it and blocking the airflow. As much as I would prefer to ventillate the air out of the case; it doesn’t really work when my cats are around. For the next build, I am going to have to ventillate the air into the case and see how it goes.
Something else that I didn’t like from this build. While the door on the case is easy to open; it was so difficult to maneuver in the case to fix anything, I just pretty much set it and forgot it. If I am going to change my maintainence routine, I will need to change the type of case I am going to use.
The Plan
So that brings us up-to-date.
We can see from the last two builds a couple issues that I need to address. We can also see about how long a dev machine tends to last me. I know what types of workloads I use it for as well.
Future posts will focus on single parts and their installation. For now, let’s focus on what I am planning on doing.
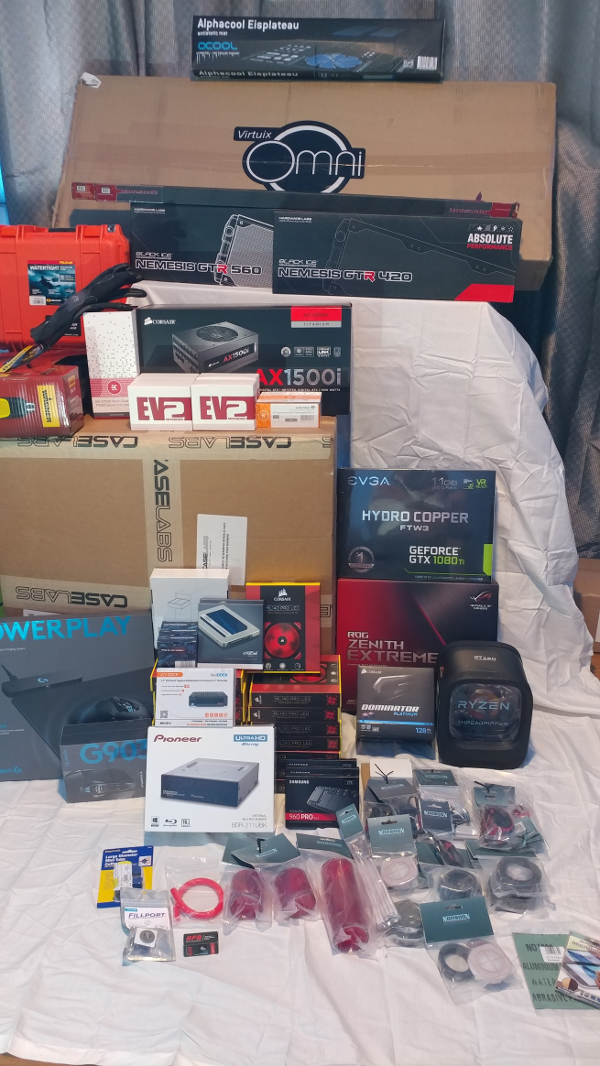
What parts to use?
Case
For the case, I chose the CaseLabs THW10. This was the first component I bought for the new system, even before I had the build planned out. They had a deadline if I wanted to do the build anytime soon. I ordered the case on May 5th and received it July 28th.
The main reason I bring up that the build wasn’t planned out is that I wasn’t sure which accessories I was going to need yet - and most likely don’t have everything I need (and maybe I few I don’t).
I chose to get the Caster kit, a 140mm Bottom Accessory Mount, a couple PSU Support Mounts (was debating two smaller PSUs at the time) and a few Flex-Bay 5.25” Device Mounts. For the case itself, I went with Gunmetal and clear windows on both sides. I also chose two 140.4 radiator mounts.
CPU
For the processor, I chose the AMD RYZEN Threadripper 1950X 16-Core / 32 Threads 3.4 GHz Socket sTR4 YD195XA8AEWOF. It was interesting waiting for this processor, because my old machine (2012 one linked above) was using an 8-Core 3.6 GHz… 5 years ago.
To cool it, I went with the full nickel version of the EK Supremacy EVO Threadripper Edition. Originally, I was going to go with all the clear components so that I could see the fluid in them - but I have decided that I am not currently going to replace the cooler on the GTX. As such, changing up the aesthetic some.
Motherboard
For the motherboard, I chose the ASUS ROG ZENITH EXTREME sTR4 AMD X399. After purchasing this board, my planned build changed quite a bit. As I mentioned above, I had to abandon the zfs route as I didn’t want to tie up one of the slots with a raid controller. I really miss zfs and would have preferred that - but I am hoping the other choices I made here will offset that decision.
Memory
For memory, I went with the CORSAIR Dominator Platinum 128GB (8 x 16GB) DDR4 2666 (PC4 21300) CMD128GX4M8A2666C15. I could have chosen to OC with faster memory - but I opted to go with the 128gb of memory. My existing machine was running 16gb at 1600 - so my compiler will definitely thank me. This did come with some light bars as well. We’ll have to see how well I can make the Corsair lights work since I don’t run Windows.
Storage
As I mentioned, ZFS was not going to be an option with the limited drive space on this motherboard. Instead, I ended up going with Samsung 960 PRO M.2 Internal SSD (NVMe).
Three of them actually. A 2TB for my main Linux machine. A 1TB for the blasphemous dual-boot Windows necessary to run most MMOs (and some of my hardware). I also got a 512gb that I will split between a shared Download drive (instead of sharing links between the two OSs) and a crypto drive for storing any blockchain files. While it does suck that I won’t have ZFS running on this machine, at least I will have some nice IOPS.
Disaster Recovery
Since I couldn’t do ZFS, I needed a backup solution. I’ll be using Crucial MX300 drives in an ICY DOCK flexiDOCK MB521SP-B. While there were other docks that better utilized the space, this one does not require trays/caddies, making it extremely useful for the limited use case.
I’ll be storing them in a Pelican 1400 case. I don’t have a fire safe and they are still stored on-site, so it is still not ideal disaster recovery. I would also like to give a shout out to 358 Studios that provided this video, where I got the idea.
Optical
As little as I use my current optical drive, I debated whether to even add it. The fact is, sometimes I do need one, though rarely. I could have gone with an external drive, but those are annoying to keep track of. I opted for the Pioneer BDR-211UBK Internal BD/DVD/CD Writer with Ultra HD Blu-ray Playback.
Mouse
I also decided it was time to upgrade my mouse. I miss using a trackball, but have gotten used to the mouse. What I have not gotten used to is the battery running dead while in MMO combat - or worse, forgetting to plug it back in after I was done playing. While I can work while tethered, I find it very annoying to try moving around with the cable restricting movement. As such, I have decided to upgrade my mouse to the new G903 LIGHTSPEED Wireless Gaming Mouse and POWERPLAY Wireless Charging System from Logitech. In theory, that will provide constant charging. We’ll see how it does.
I want to make a note here for anyone purchasing from Logitech. I was unable to check on my pre-order shipping status on their website. I tried replying to the Logtech email, but that bounced back. I had made the order using PayPal. The order receipt said to contact this digitalriver email address with any order questions or concerns. I tried reaching out to that address, and it bounced as well. Half my order had arrived, so I didn’t think it was a scam - but bouncing the “Contact Us” links is not great customer service. I called Digital River (twice) to report the problem and they gave me the run around. The sent me to both Logitech and PayPal to fix their @digitalriver.com email address. In the end, I asked them to report it to their IT department and gave up on trying to get them to listen to me. When I finally got ahold of Logitech, I found out that the reason I could not look up the order online was because you have to use a 1-off password they sent in an email confirmation, rather than your actual Logitech password. If you are trying to check the status of your order, go back to the order confirmation and read through it.
Graphics
For the graphics, I chose a pair of EVGA GeForce GTX 1080 TI FTW3 iCX Hydro Copper GAMING, 11G-P4-6699-KR. Unfortunately, EVGA would not allow me to buy a pair. Considering my goal with this build, it might make sense for me to do the build with this single card – then later upgrade to SLI once I can buy two of the same model. It’s not what I want to do - but I would rather do that than continue to postpone the build.
For those trying to build SLI systems, choosing the latest greatest card might not be your best option. EVGA only allowed me to buy one card and told me to check other online vendors for a second. After EVGA notified me again that the card was available, I tried to purchase a second, but it would not let me. I contacted them again, and they said there were no other vendors carrying the card at this time. I realize that this card shortage is due to the miners - but I wonder if NVidia realizes that their vendors are preventing people from utilizing a highly advertised feature (SLI).
Power Supply
Powering the system, I chose the Corsair AX1500i. I was going to do two smaller power supplies, or even a water-cooled FSP Hydro PTM+ – but it seems like the AX1500i is really my best choice right now.
Radiators and Fans
I’m going to do a Hardware Labs 560mm Black Ice® Nemesis® GTR Black Carbon Radiator on the top right and a Hardware Labs 420mm Black Ice® Nemesis® GTR Black Carbon Radiator with a Monsoon fillport on the top left (more on that below). I didn’t know I was going to do the fillport at first, so I grabbed 16 (it’s not like I can’t find a use for two more fans) of the ML140 Red 140mm PWM Magnetic Fan. I was originally going to do both blue/red (for temperature controlled lighting) but… maybe as a later upgrade.
Obviously, I don’t have that many fan headers. Most people would just choose a good fan controller with some awesome software – unfortunately, most of that software does not work within Linux. I could go with a purely manual controlled fan controller, but I want it to be temperature controlled, not manual. I decided I’ll try hooking them up using a couple Phobya 4-Pin PWM to 8x 4-Pin PWM Splitters. I’m thinking that I will either have all 8 fans on a single radiator controlled from one PWM (like CHA_1) or maybe I’ll do the 8 outside fans on one and the inside fans on another (push/pull configuration). Not entirely sure yet.
Reservoir
For the reservoir, I grabbed a smörgåsbord of Monsoon parts. I’m going with the blood red tubing and red accents (fill port, tension rods, EV2 fittings, CCFL bulbs, etc etc).
Specifically:
| Part | Qty | Description |
| MMRS-FDP-RC-RD | 1 | Monsoon MMRS Fill Drain Port Round Cap - Red |
| MMRS-FDP-RCS-RD | 1 | Monsoon MMRS Fill Drain Port Round Cap Spacer - Red |
| MMRS-FDP-BASE | 1 | Monsoon MMRS Fill Drain Port Base |
| MMRS-AT-050-BR | 2 | Monsoon MMRS Acrylic Tube 50mm - Blood Red |
| MMRS-TR-050-RD | 2 | Monsoon MMRS 50mm Tension Rods - Red |
| MMRS-BH | 2 | Monsoon MMRS Acrylic Tube Coupler - Black |
| MMRS-AT-150-BR | 1 | Monsoon MMRS Acrylic Tube 150mm - Blood Red |
| MMRS-TR-150-RD | 1 | Monsoon MMRS 150mm Tension Rods - Red |
| MMRS-SP-3P | 1 | Monsoon MMRS Triple Port End Cap with Dual Side Ports - Black |
| PETG-1258-4-BR | 2? | Monsoon PETG Hardline Tube 1/2 x 5/8 - 36” 4 Pack - Blood Red |
| EV2-1258-12-RD | 4? | Monsoon Hardline Economy Compression Fittings, 1/2” x 5/8” 12-Pack - Red |
| MON-BENDTUBE-12-RD | 1 | Monsoon 1/2” ID RED Silicon Bending Insert - 1 Foot (for 5/8” OD Tube) |
| MMRS-MT-25MM-RD | 4? | Monsoon MMRS 25mm Reservoir Mount - Red |
| MMRS-CCFL-050-RD | 2 | Monsoon MMRS Dual Bulb CCFL Light for 50mm Tube - Red |
| MMRS-CCFL-150-RD | 1 | Monsoon MMRS Dual Bulb CCFL Light for 150mm Tube - Red |
| CCFL-INV-REV2-4 | 1 | MONSOON CCFL INVERTER Rev. 2 – FOUR BULB |
| MMRS-PIT-BK | 1 | MMRS Push In Anti-Vortex Trident Two Pack - Black |
| MON-SPL-RD | 12? | Monsoon Premium G 1 / 4 Plug - Red |
| MON-TPL-RD | 1 | Monsoon Premium G 1 / 4 Temperature Plug - Red |
| MON-LPL-RD | 2 | Monsoon Premium G 1 / 4 LED Plug - Red |
| MON-SBP-RD | 1 | Monsoon Silver Bullet Antimicrobial G1/4 Plug - Red Anodized |
Looking at the parts list, you might be able to surmise the general plan. I’m planning on doing a 150mm section in the center with a 50mm section above/below it. I just basically like the look of the divided radiator more than the giant acrylic tube. I bought enough lights to go behind the entire tube, and enough mounts to mount them – but we have to see what my mounting options really are inside the case. I know - I should have put the case together and measured first. I was just anxious to get all the parts together.
I’m planning on putting the color-coordinated fillport on the top of the case, next to the 420 radiator. That should go down into the top of the reservoir.
The radiator (or both if I rearrange things later to be parallel) will go into the next inports.
At the bottom, it will exit to the EK Pump (below) as well as to a PrimoChill Fillport / Pass Thru Fitting - Dark Nickel in the case; which externally I plan to have hooked up to a quick disconnect.
I plan on putting the temperature and silver plug in the bottom section as well. Maybe the LED or a flow meter. Not really sure.
It is also probably obvious that I had no idea how many of some items to order. I tried to over-order if unsure. I’d rather have an entire extra pack of fittings than one too few. I was going to engrave the fittings, but in my rush, I forgot that was an option.
I’d like to take a moment to give a shout out to Gene Phipps who not only made some informative videos, but was willing to review my reservoir plan and encouraged me to wait to buy the parts until I could measure the case (physically or in sketchup). I admit I didn’t do that (as I said above), but I appreciate him trying to help rather than going for the quick sale.
Pump
The pump on my last build had died. Of course, that was after running for 5 years straight 24x7… I decided to go with the EK-XTOP Revo Dual D5 PWM Serial this time. If one of the pumps die, the other one should take over while I order another. EK has a few different SKUs. This is the one that comes with both pumps.
Miscellany
To store things like Clonezilla, LiveCD, etc - I’m going to add a Akust Desktop 5.25” Drive Bay Drawer. I’ll probably steal some of the removed Pelican foam to keep things from rattling around in there.
Tools and Safety
Of course, it’s been quite awhile since I did a build - and even then it was with flexible tubing. This time around, I needed to get some tools. While I’ll probably give up wearing them, I’m going to start bending the tubes while wearing the Ironclad Heatworx gloves.
To protect the desk, the computer parts and reduce the chance of losing things, I’ll be using the Alphacool Eisplateau Anti-Static Work Mat.
To cut the tubes, I chose the BassCraft Mini Tube Cutter. It’s rated to be able to cut 1/8” to 1-1/8” tubes. That should handle anything I need to throw at it.
That will likely leave it a bit rough.
Instead of using the plastic camfer tool everyone is using, I decided I will try the PrimoChill RFB Rigid Tubing Finishing Bit - 3/8in. ID x 1/2 in. OD. The videos looked good, but I found no references of anyone using the PrimoChill tool on Monsoon tubing - so we’ll see.
If that doesn’t do a good enough job, I also grabbed some XSPC PETG Edging Sandpaper and Dynaflo Liquid Armor Microfiber Cloth 8” x 8” just to help smooth things out.
To actually heat up the tubes, I chose the Wagner Furno 750. I know it’s overkill. I was going to do the Furno 500 for $40 - but then they would have tacked on shipping making the two very close in price. Some may argue that I don’t even need the 500, but since I have never done this before, I really like the idea of being able to tune in the temperature that works for me. With the 750, I will be able to do the same thing with the airflow. One of the things I like about both models is that it has a built-in stand which should make it easier to keep upright.
I’d also like to give a shout out to JayzTwoCents who has provided hours of videos on everything from bending tubes to Monsoon EV2 fittings to fan airflow comparisons. I’m sure a ton of those videos had an impact on my decisions.
Android Things?
I’m not sure if it is going to make it into the system yet, but early on I had also purchased the Android Things Raspberry Pi3 starter kit as a possible way to manage my lights/fans without being required to run Windows. I really wanted my lights to be temperature-controlled and my fans to keep positive pressure, even when reducing speed. Even if this doesn’t make it into the build initially, I may work on it after the fact and retrofit the build.


